
What is it about trick-or-treating that every kid absolutely adores?
There are the costumes, the pretending to be something that you’re not, the spooky unknown, the mystery, the stepping outside of reality for a moment, the getting a reward for your bravery knocking on a stranger’s door, the after-dark shenanigans. It’s really alluring.
When my daughter was little it was easy to avoid, but as we’re approaching the preteens there’s a lot more social pressure to run with the pack. To do what the other kids are doing, and not feel left out of that tradition, celebration, and — in a sense the rebellion. I think children know that candy isn’t the best choice, so having it given to you over and over and over again at multiple houses must feel really exhilarating.
Our family is pretty anti-candy. We just don’t eat it. We avoid eating refined sugar. I made that change long before I had my own child. But humans have a sweet tooth and saying no to your child’s trick-or-treating fantasies can be really difficult.
The last couple years I’ve given in a little bit and I’ve let her go around to the houses in our neighborhood and have the experience. But I also made a pretty strict deal with her. The deal was she can only keep as many pieces of candy as she is old (she honestly usually eats one or two pieces and we put the rest away and after a few weeks she ends up forgetting about them because she doesn’t even like them that much). The rest of the acquired candy hastily went into the bin. Well, that was until last year, when I had some inspiration.
I dislike what candy represents in our society, I dislike how it’s affecting our children’s health, I dislike how it’s produced, but I also dislike waste! So binning the candy made me feel sick. I kept thinking of the laborers harvesting the chocolate for instance. Or just the amount of energy that goes into the production. The resources that are used. What a sick and twisted way to celebrate something. But hasn’t everything become corrupt in our modern world? I digress.
Last year I saved all of the candy that my daughter can’t eat — one because she has allergies to food dyes, two because she is only allotted a certain amount of candy of which I make her pick the best — and I stashed it away thinking about the gingerbread houses that I have always loved to make and admire. Being able to take something that feels so unhealthy and wasteful and make it into a beautiful way to celebrate the season, to give it a new life as something traditional and authentic, to give it reverence and enlighten it, well that felt better.
I honestly can’t think of a more satisfying use for this Halloween candy that would have unnecessarily gone to waste. We’ve created a beautiful tradition here and I hope your family will enjoy it too.

Crafting a Traditional Gingerbread House
In this article I’m going to walk you through the steps that I use to create this absolutely beautiful gingerbread house.
I used an old-fashioned boiled molasses gingerbread, a very hard dough when baked. This gingerbread house could have easily lasted the whole year. We had trouble throwing it out in Spring because it still looked so good.
You’ll find the recipe for my boiled molasses gingerbread below. It’s a really easy dough to work with, it rolls out beautifully, and it cuts evenly. If you bake it soft it can definitely be used for cookies (my daughter even liked to eat the crispy bits), but it’s more of a building material than a cookie recipe. It doesn’t necessarily follow the dietary guidelines of “properly prepared” that I usually stick to, but, if you wanted to substitute sprouted flour for the all-purpose flour, and coconut sugar for the cane sugar, I suppose it wouldn’t be a terribly unhealthy recipe!
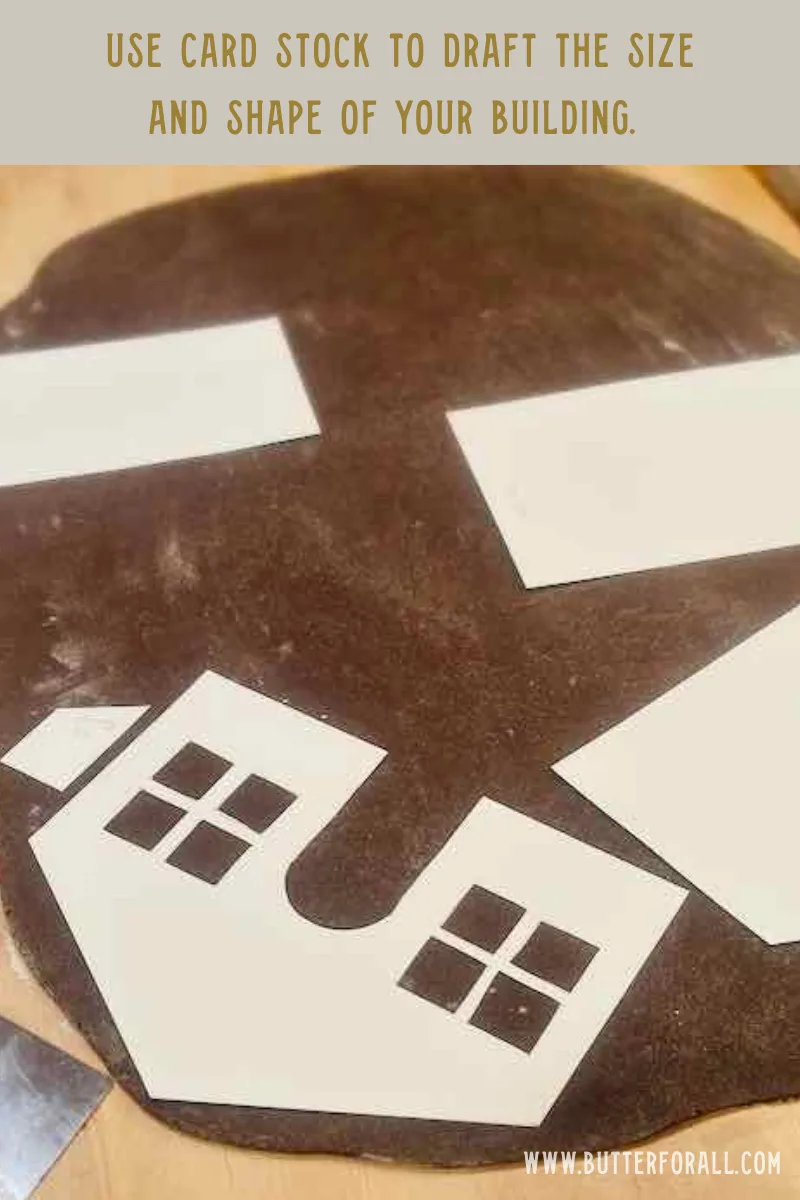
In the photo above you can see that I drafted my structure’s frame on cardstock just using a ruler and pencil to make the structure’s shape. There are many different patterns you can buy or find online if you don’t feel confident that you can make your own.
After making your boiled gingerbread, roll your dough about 1/3 of an inch thick — you want a really strong structure to build with. Anything thinner than 1/3 inch increases the possibility of breaking during construction or weakening with humidity.
Arrange your pattern on top of the dough and cut the pieces out with a sharp paring knife.

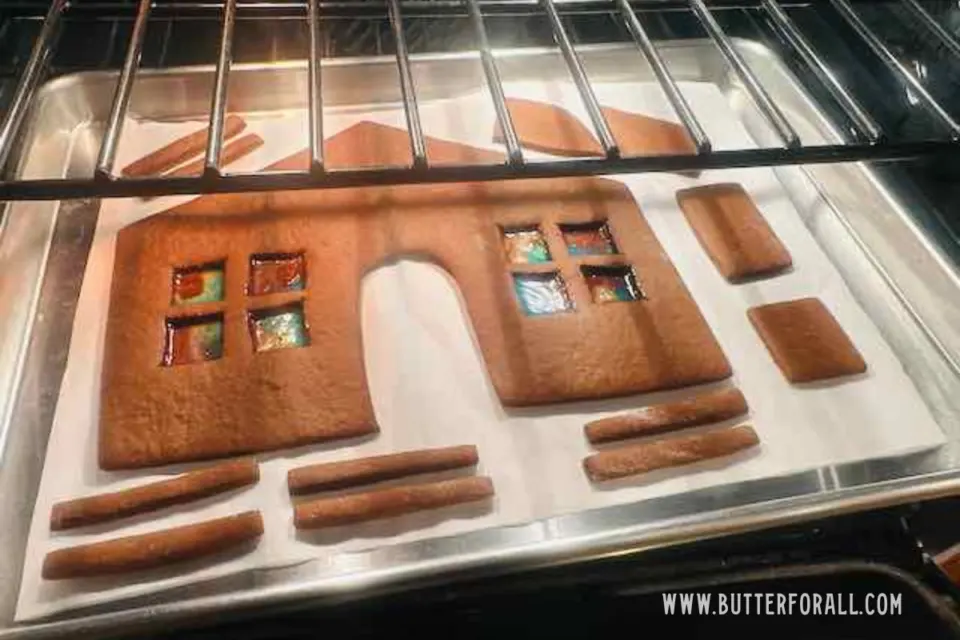
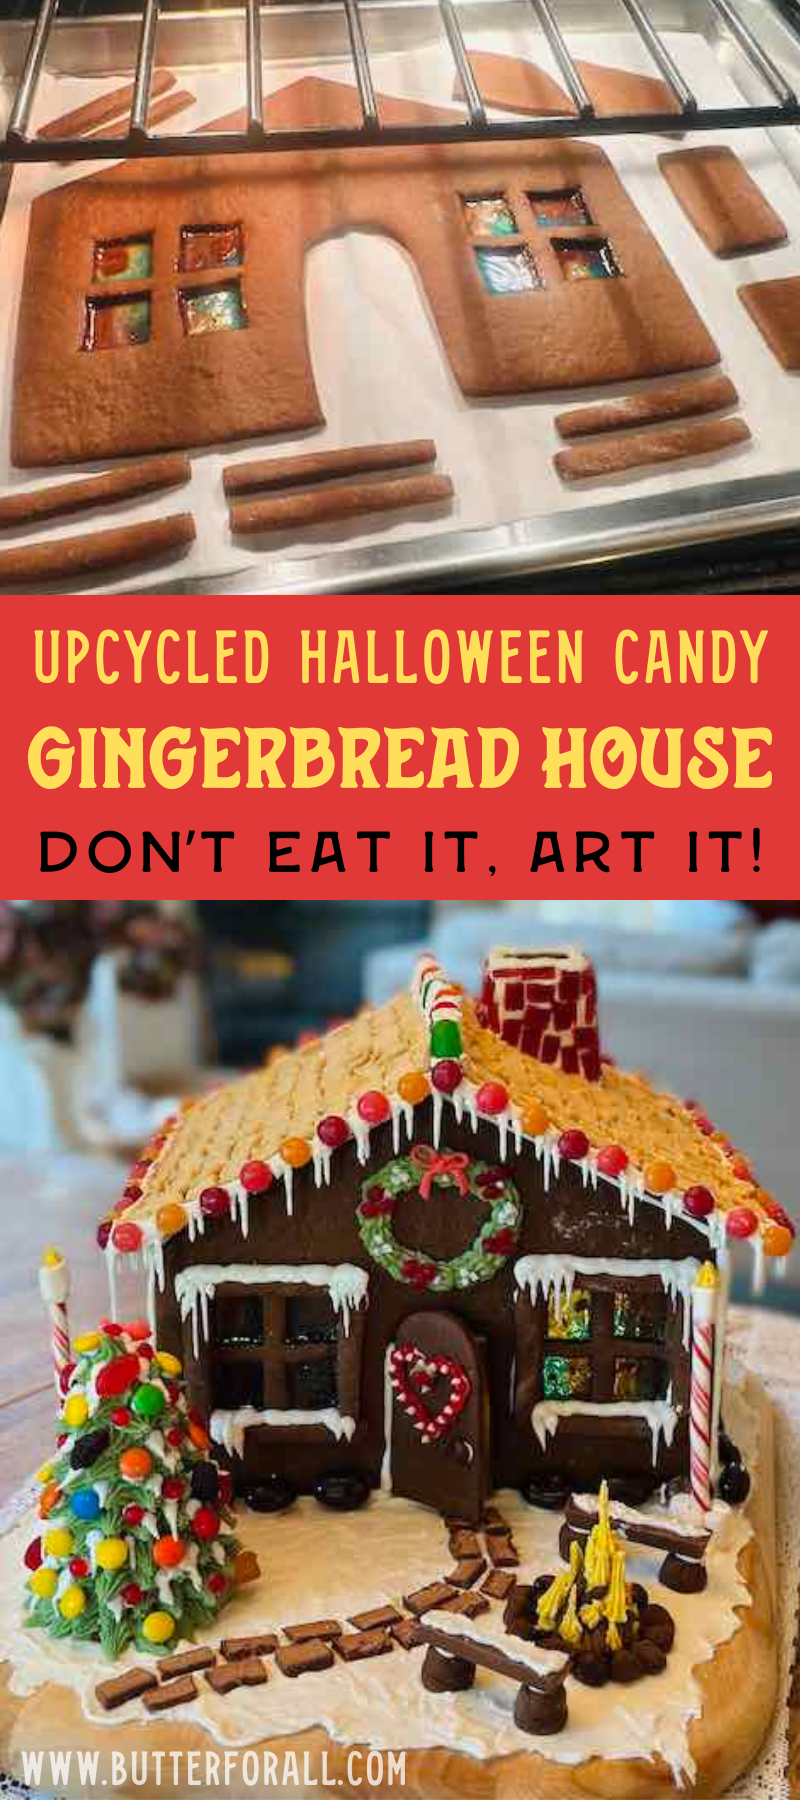
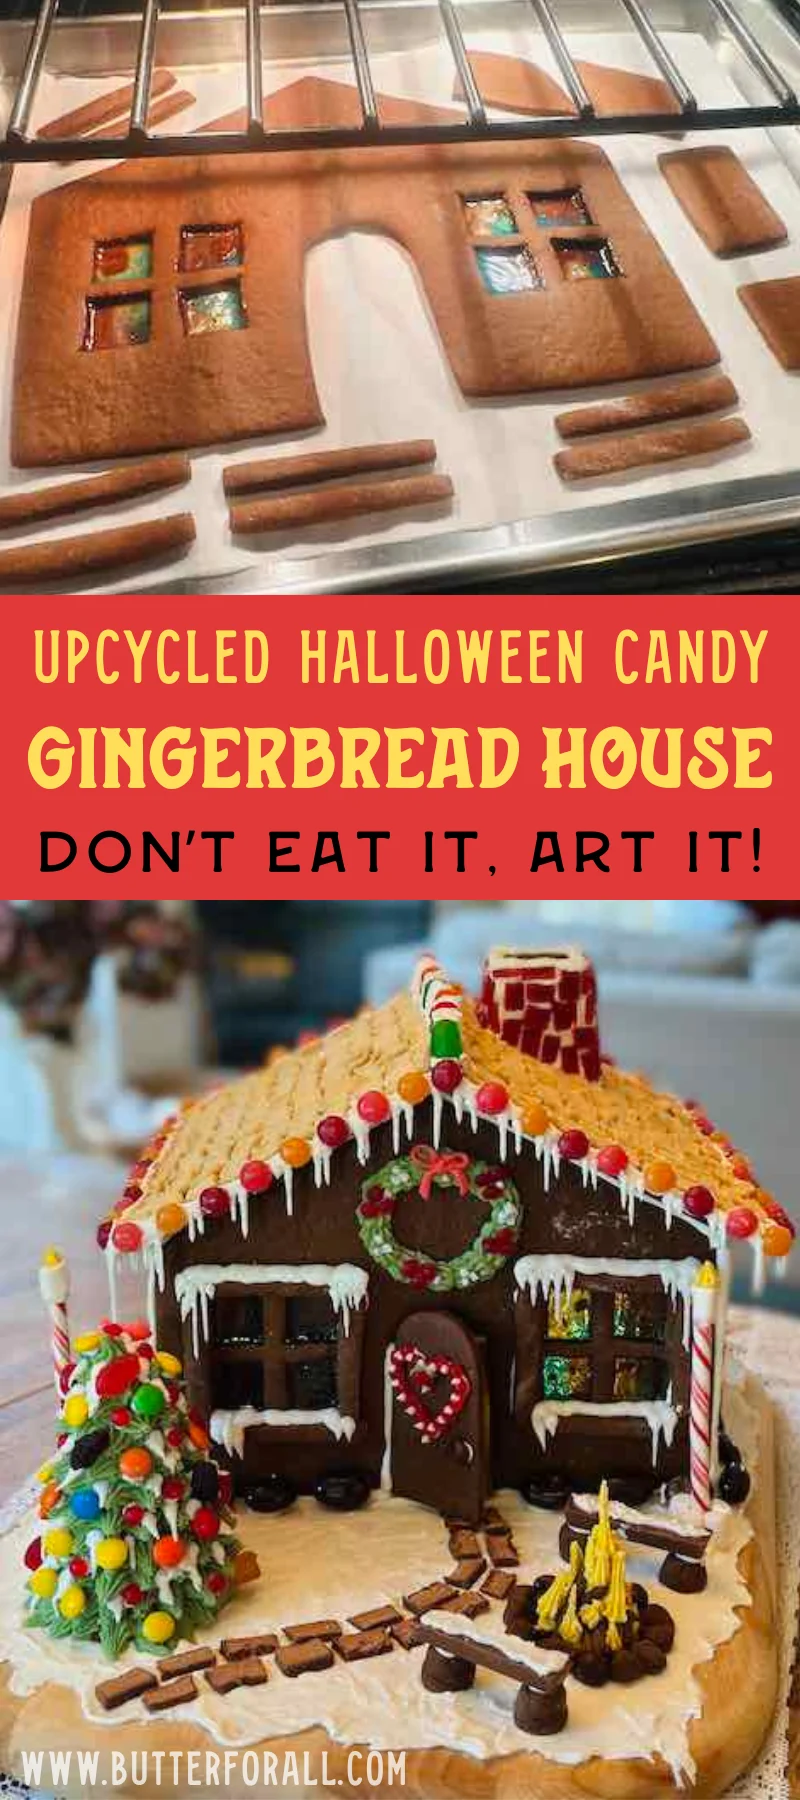
Once the dough is cut carefully transfer it with spatulas to a parchment-lined baking sheet. If you have any hard candy like Jolly Ranchers or colorful suckers they can be placed in the empty windows before baking. During baking they will melt into a beautiful stained glass. You just need to make sure that you’re using hard candy — the kind that cracks with a hammer.
Bake your boiled gingerbread at 350° F for 8 to 10 minutes, then turn the oven off and let it dry completely in the oven with the door ajar.
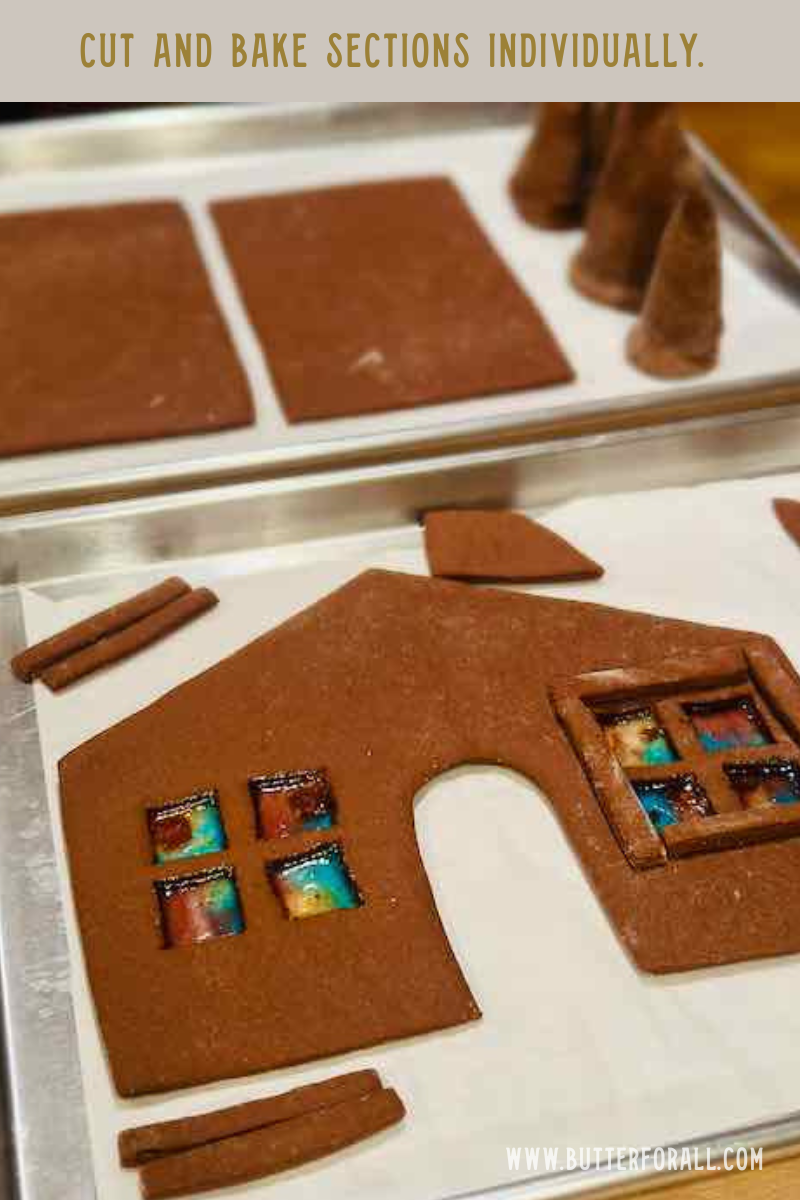
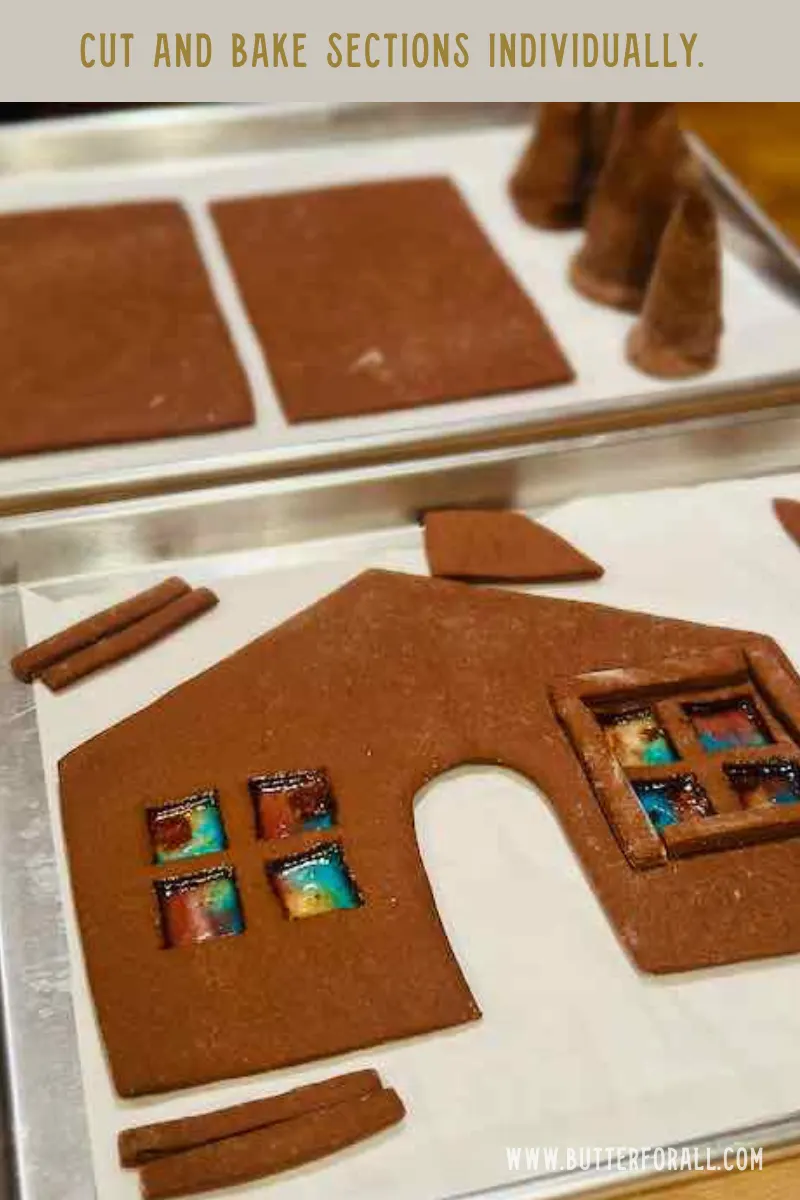
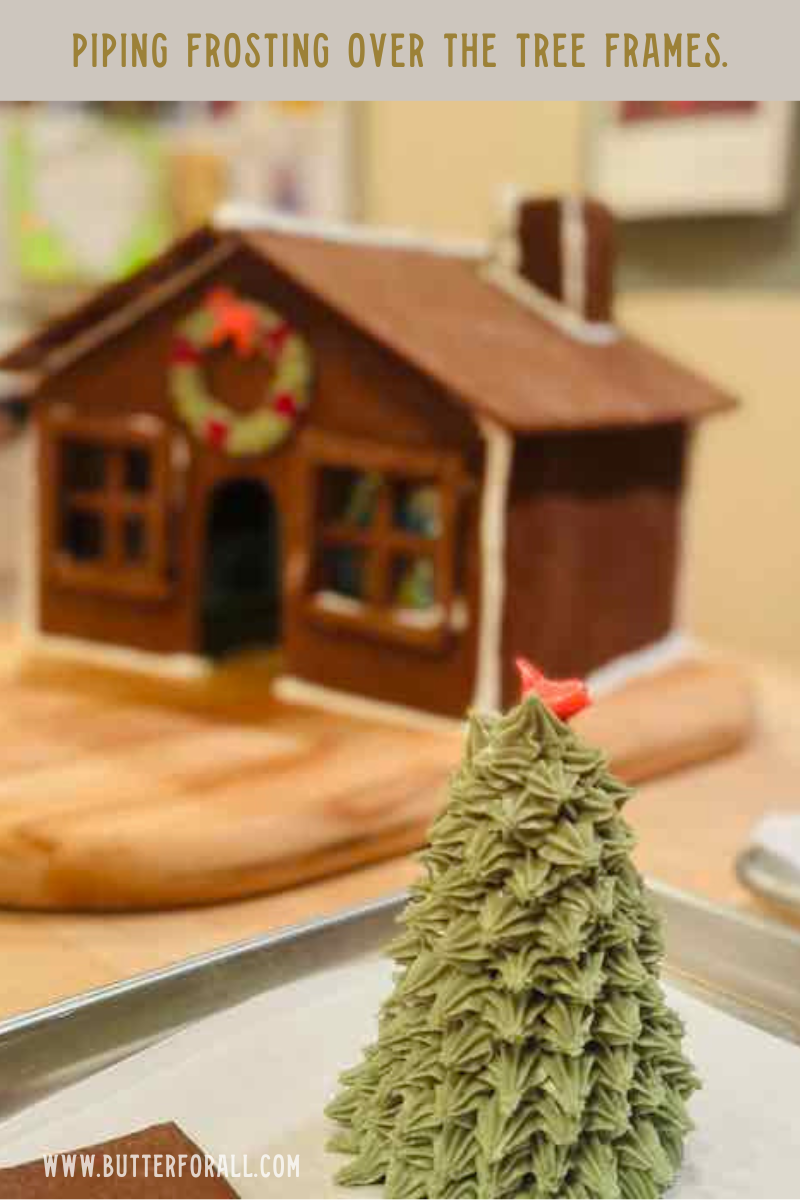
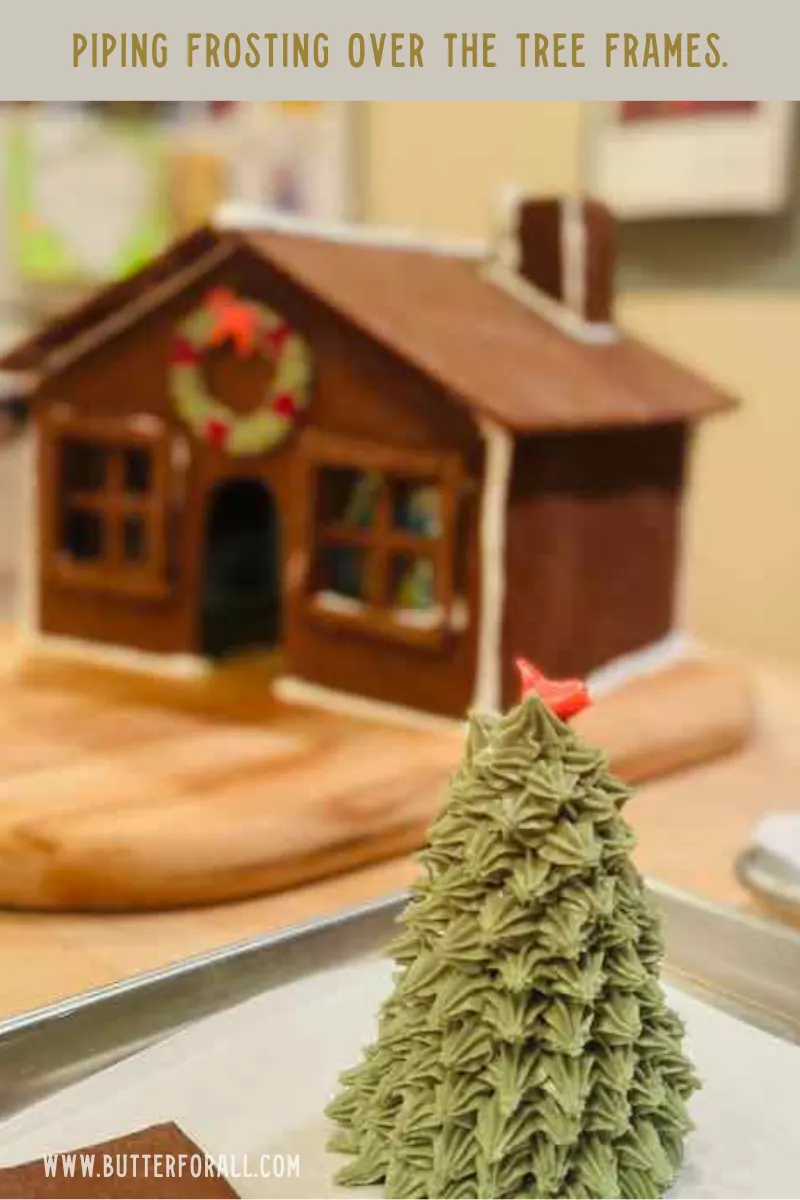
Don’t forget to make some embellishments with your gingerbread. You can make individual cutout frames for the windows, and using a tin foil base you can make tree shapes to frost later with icing.
Gingerbread House Construction
Putting a gingerbread house together is relatively simple if you have the right “mortar”. I use what’s called a royal icing, with egg whites instead of water. When the egg white icing dries it’s very stiff and secure. I’ll share the super easy recipe below.
Royal icing is most easily applied using a piping bag and piping tips. Don’t be intimidated if you’ve never used one before; it’s really as simple as drawing a line down the side of your building or at the seams and placing another piece of gingerbread against it. If your royal icing feels like it’s not holding it’s probably not thick enough and you’ll just need to add a little more powdered sugar to get it to the right consistency.
You’ll want to assemble your gingerbread house on some sort of portable flat surface. If you’re making a small gingerbread house you can use a festive plate. A larger house can be made on top of a cutting board or slab of marble. Even a piece of stiff cardboard wrapped with festive wrapping paper can make a nice base.
Once the house is assembled, leftover royal icing can be spread around the base of the house as fallen snow, and colored and used with a star piping tip to make trees, bushes, and other decorations. You can save your leftover royal icing (covered in an airtight container) for adhering decorations, or make a new batch when you’re ready to put the finishing touches on the house.
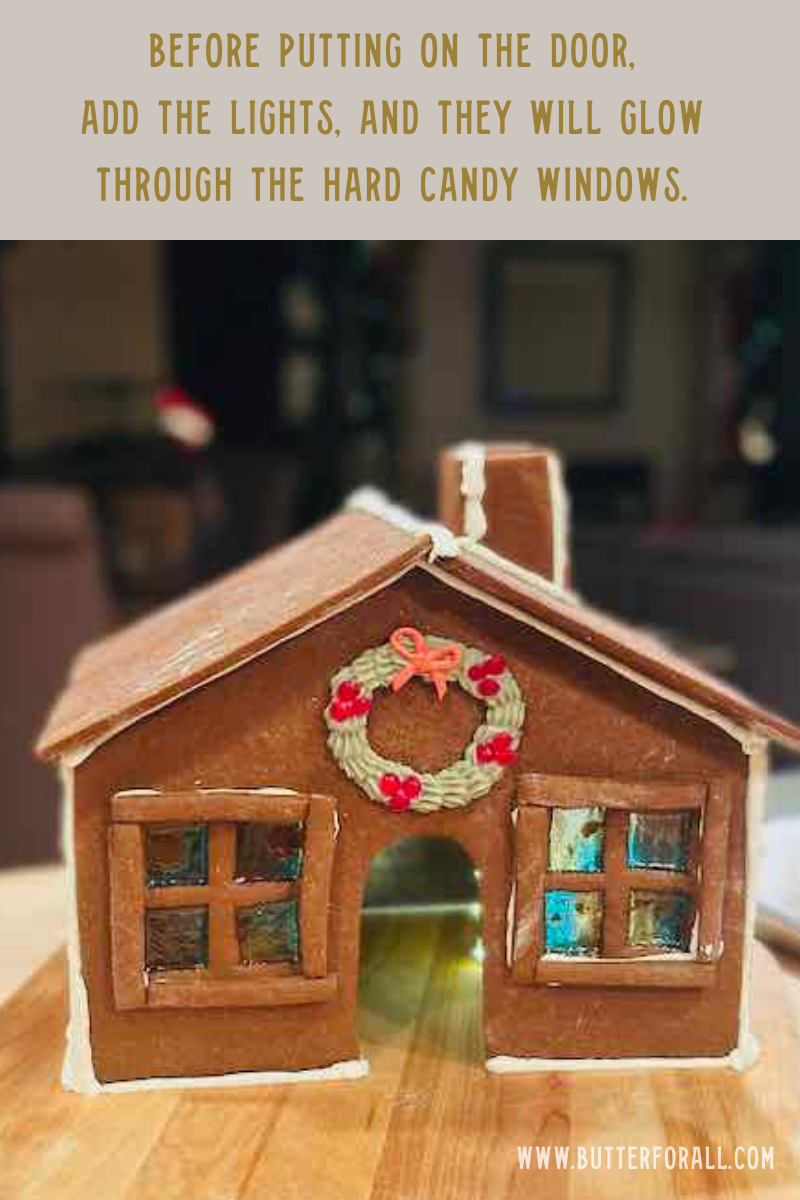
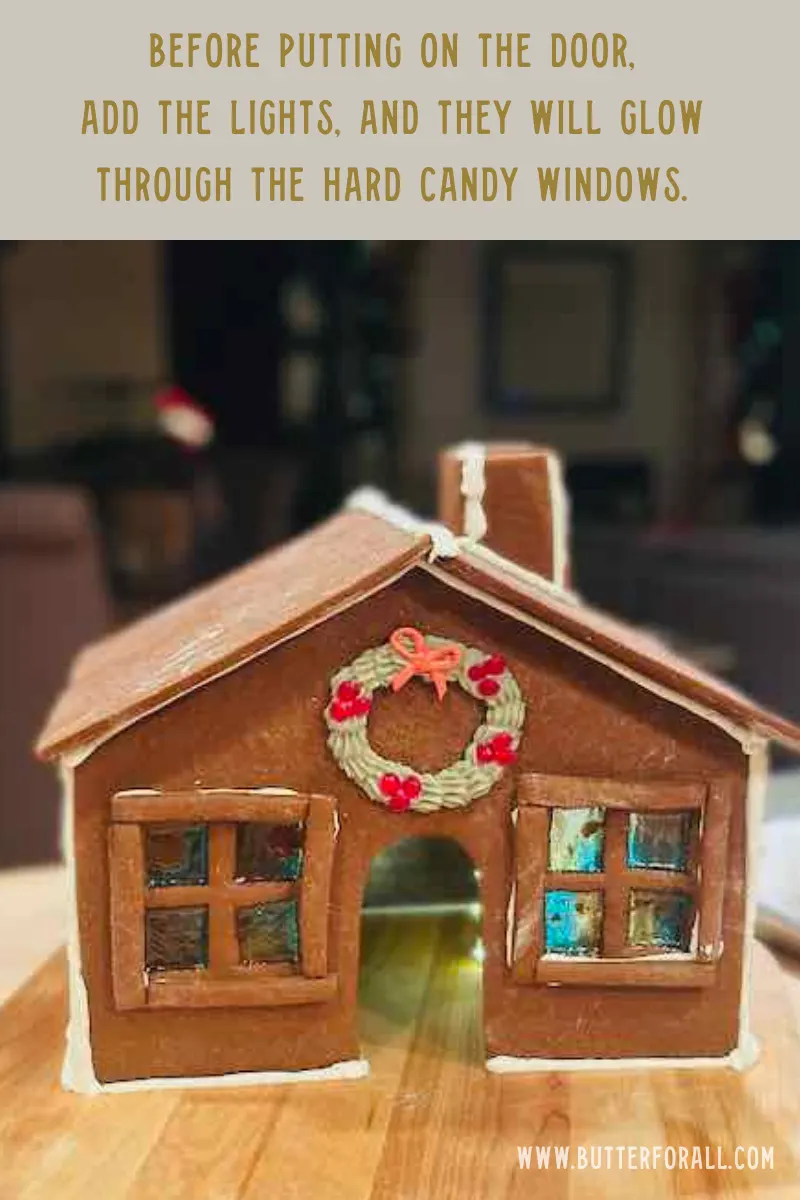
Adding lights to this house really took it to the next level.
You’ll want to add battery-operated lights to the inside of the house before you put the roof on. Or at least before you put the door on! I forgot to put them in before the roof went on and we had to squeeze them through the doorframe. We also decorated one of our smaller trees and put it inside the house so that you could peek at it through the open door.

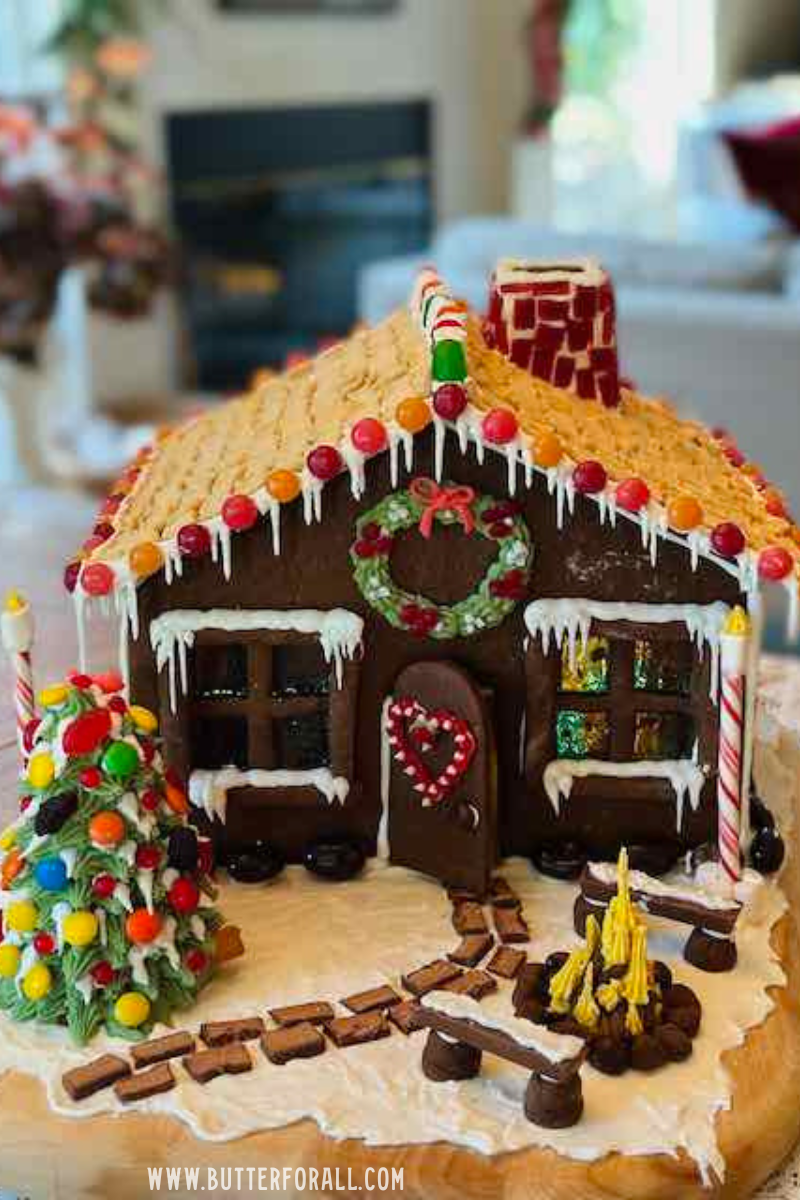
Decorating Your Gingerbread House With Upcycled Halloween Candy and a Few Festive Touches
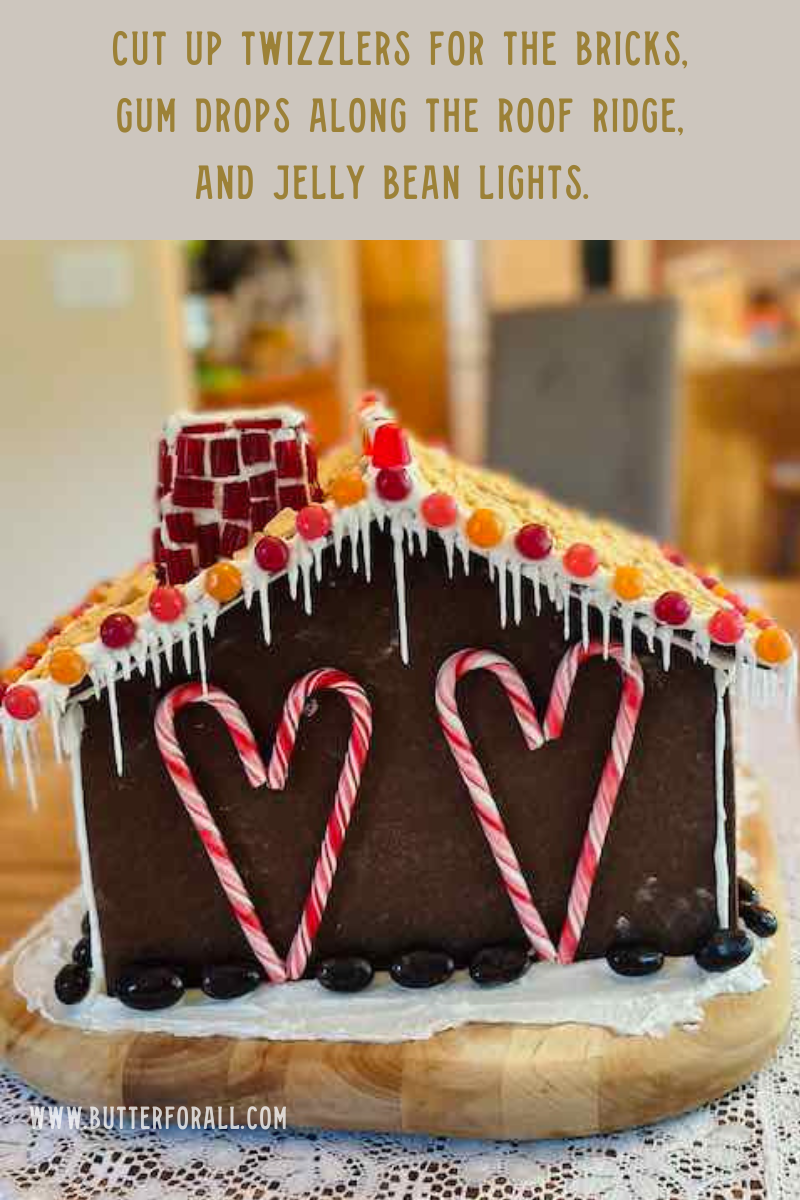
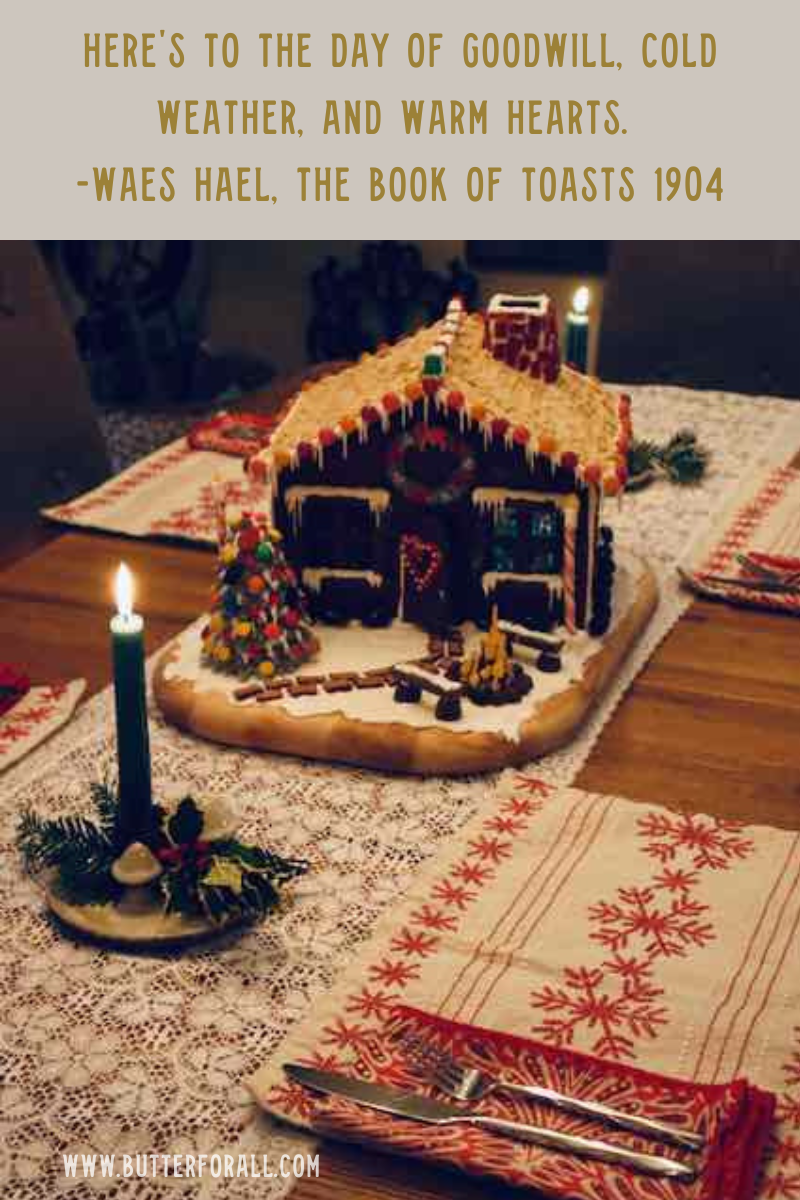
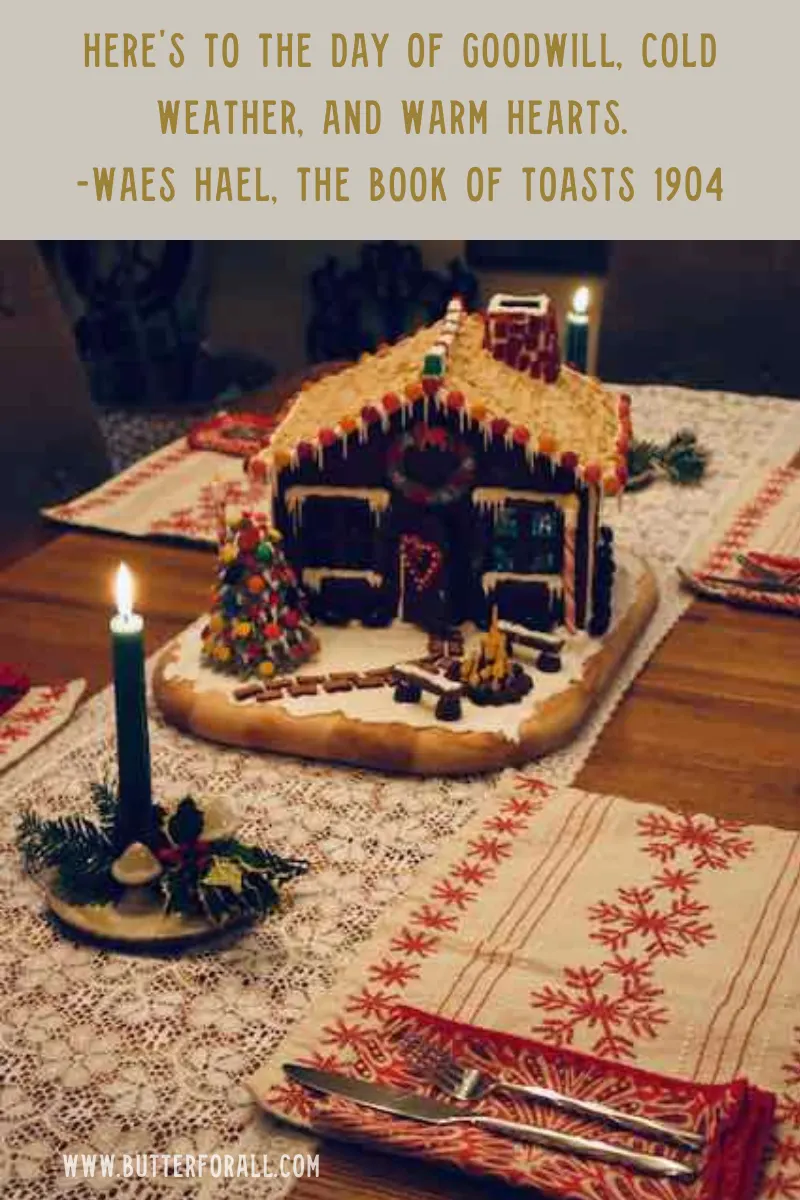
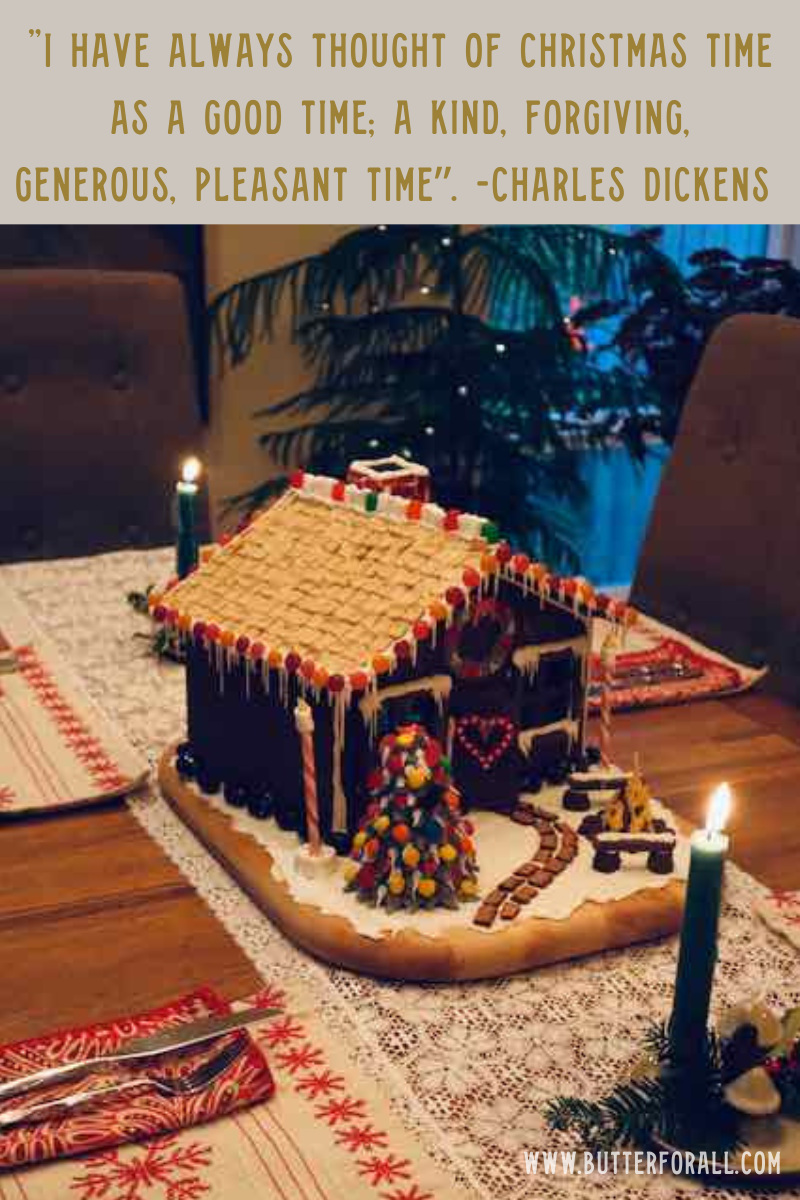
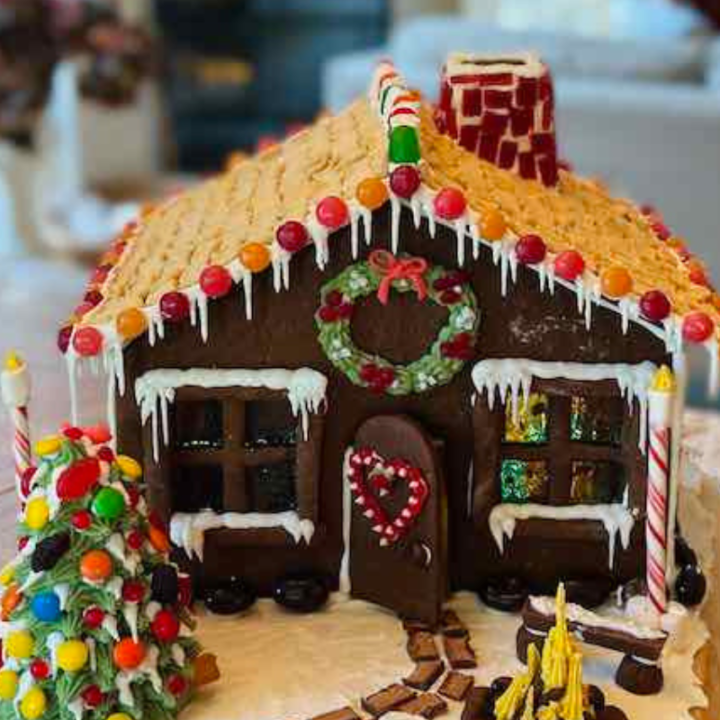
I obviously didn’t use only Halloween candy. It was fun to find a few things that added the Christmas aesthetic. On the back side of the gingerbread house we made these organic candy cane hearts, and put organic chocolate-covered almonds (it’s okay, Mom. Let them sneak one or two!) around the base of the house to look like stones.
Look closely at the roof and you’ll see that we used cut-up Twizzlers as the bricks on our chimney, old-fashioned gumdrops along the ridge of the roof, and brightly colored jelly beans along the frame of the roof like twinkling Christmas lights. These were mostly Halloween candies that my daughter was not able to partake in due to the food dye, and also just being kinda gross.
We used some old stale cereal we had languishing in the cupboard for the realistic roof shingles, overlapping them as we went to create a cottage core vibe.
Use your royal icing to adhere many different kinds of candy to the outside of your gingerbread house.

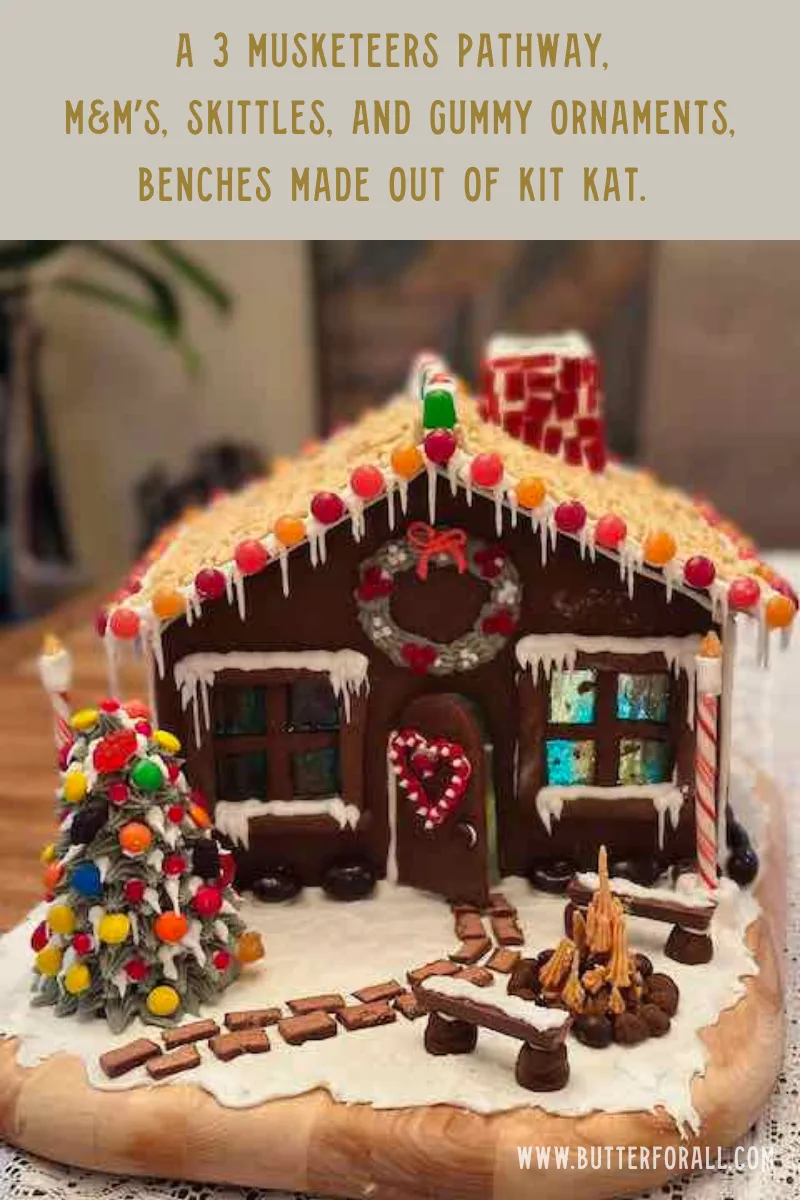
We had a lot of fun getting creative with the different Halloween candies. We decorated our tree with the most colorful candies, laid bricks of sliced 3 Musketeers for a pathway to the door, and used Kit Kats as the seats on the benches by the fire.
It’s hard to see in this photo but I also used gingerbread to make the bricks around the fire and even little logs in the fireplace. The stumps the benches are resting on are also made of gingerbread. It’s a great way to get imaginative with your leftover gingerbread scraps and the possibilities are endless!

Admiring Your Gingerbread Masterpiece
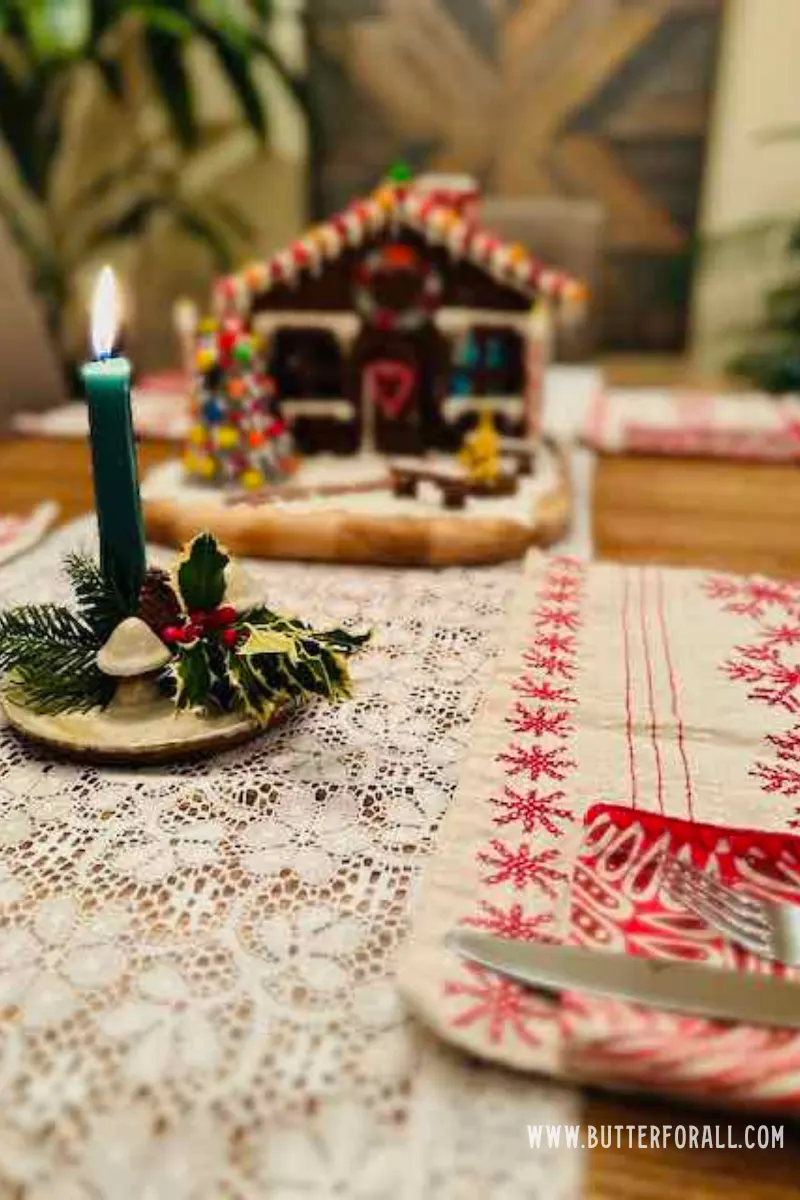
Nothing could prepare me for the feeling of accomplishment we got when we saw our finished gingerbread house masterpiece on the table.
That was until it got dark…
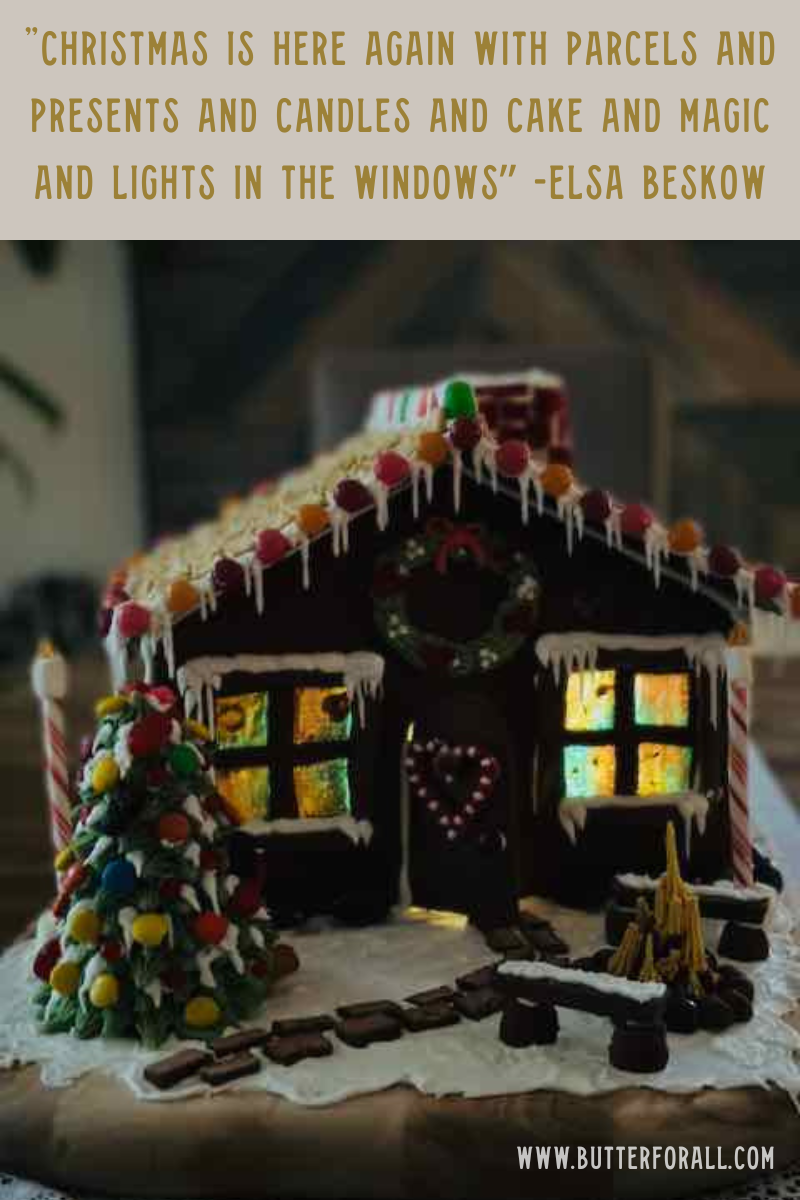
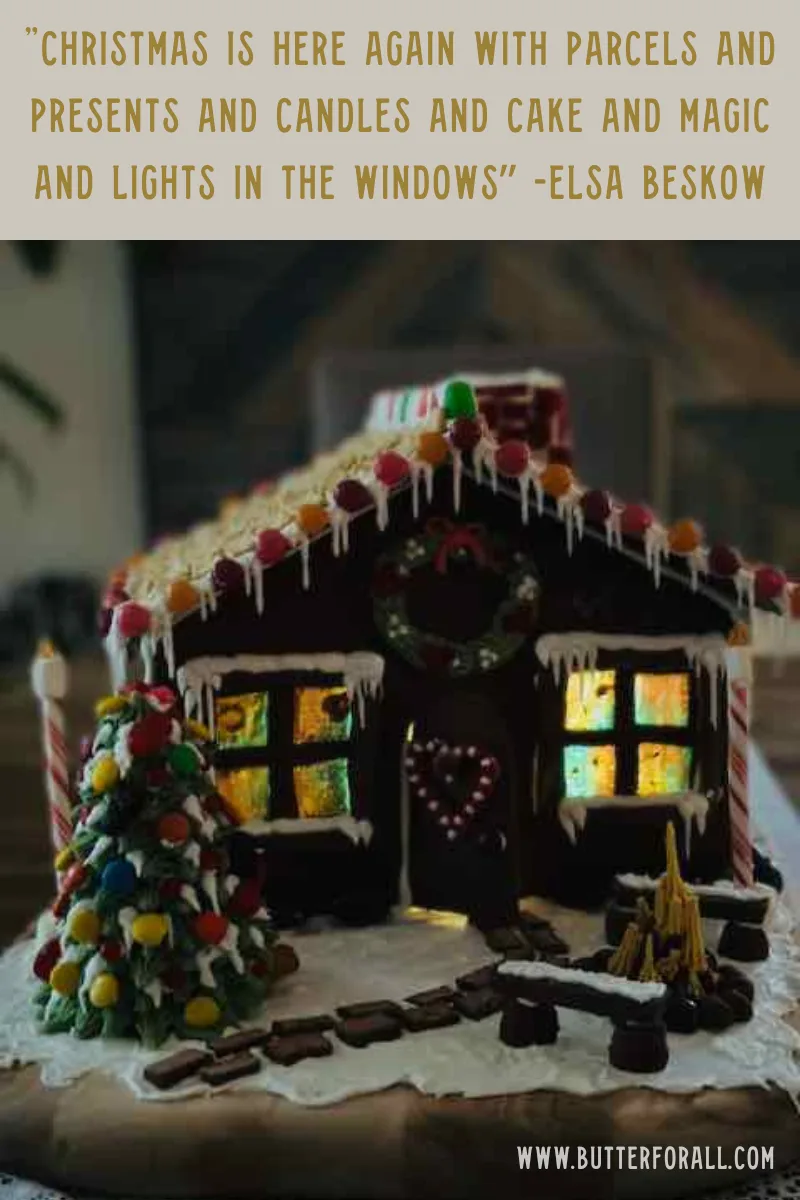
I couldn’t take my eyes off this magical little world we had created. So quaint, so sweet. A perfect hideaway for a little house elf.
I’ll share the video on my Instagram where you might even get a peek in the door.
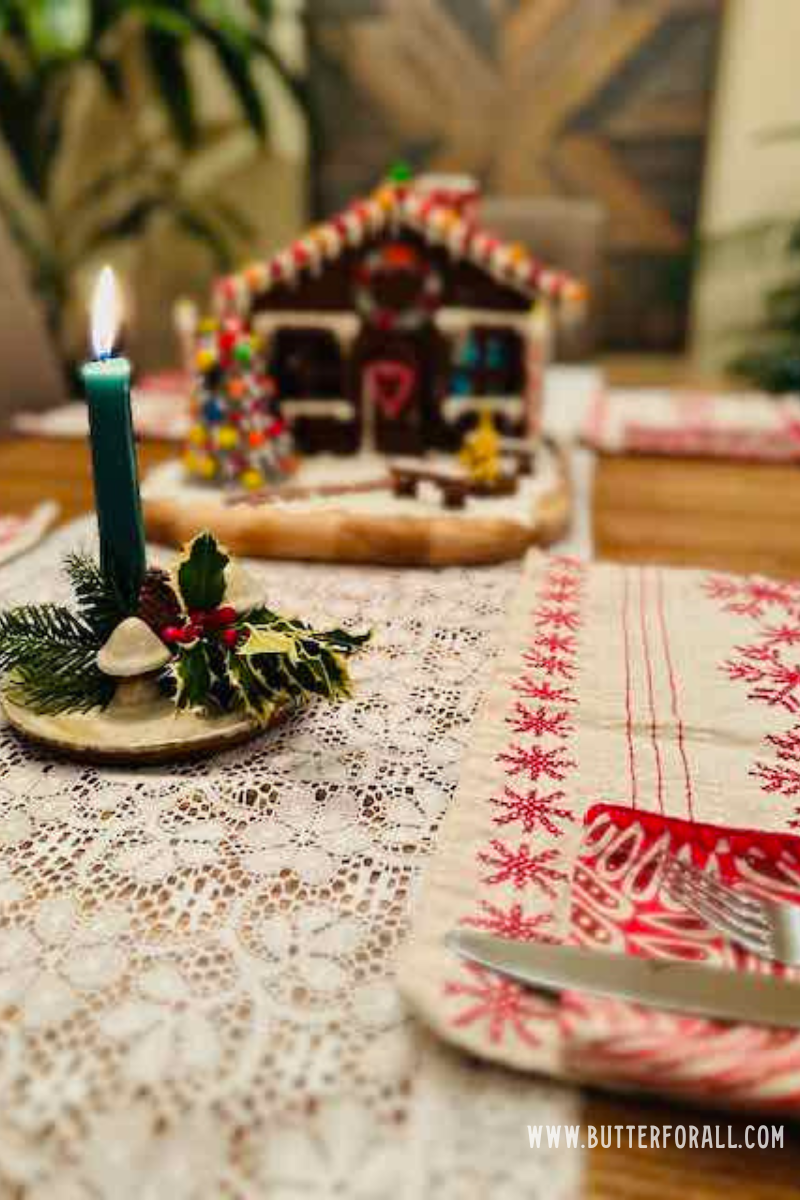
Enjoying Your Gingerbread House All Season
A colorful gingerbread house is an absolutely stunning centerpiece on your holiday table. Everyone will be enraptured and the children will marvel over it.
Eventually, after at least a month in the dining room, the windows on our house started to melt, but we kept it a while longer because it was just too hard to part with. Make sure to keep your gingerbread in an area that has relatively low humidity so it will last as long as possible.


Old-Fashioned Boiled Molasses Gingerbread
Put your Halloween candy to good use and bring magic and wonder to life with a traditional gingerbread house.
Ingredients
- 2 cups molasses
- 12 tablespoons butter
- 1 cup cane sugar
- 1/4 cup milk
- 8 cups all-purpose flour
- 3 tablespoons ground ginger
- 1 tablespoon ground cinnamon
- 2 teaspoons baking soda
- 2 teaspoons salt
- 1 teaspoon ground cloves
- 1 teaspoon ground nutmeg
- 1 teaspoon ground allspice
Royal Icing
- 1 pound powdered sugar
- 3 egg whites, beaten
Instructions
- In a medium-sized saucepan, bring the molasses to a rolling boil.
- Add the butter, sugar, and milk and bring back to a boil. Remove from heat.
- Meanwhile, sift the dry ingredients together into a big heat-resistant bowl.
- Add the hot molasses to the dry ingredients and stir carefully to combine thoroughly. This step is easily done in a stand mixer with paddle attachment.
- Let the dough cool until you can handle it.
- Preheat oven to 350°F.
- On a lightly floured surface roll the dough to 1/3-inch thickness while it is still warm.
- Cut out in desired shapes and place on a parchment-lined baking sheet.
- Bake for 8-10 minutes, just until the edges are browning. If you want to eat the gingerbread remove it from the oven after 8 minutes and let it cool. If you plan to build with the gingerbread bake it for 10 minutes and then let it cool in the oven with the door ajar for at least 90 minutes.
For the Royal Icing
- Stir powdered sugar into the egg whites until you have a thick yet pipeable paste. You probably won't use all the sugar.
- If you add too much sugar, just add a few drops of water until the icing is the right consistency.
Notes
Baking Multiple Pans of Gingerbread
If you have multiple pans of gingerbread bake them one at a time and take them out after 10 minutes. Once all have been baked, turn the oven off and place them all back in the cooling oven to dry out completely.
Making Enough Royal Icing
If you are decorating a big house you might need to make several batches of royal icing. It's easy to make as little or as much as you need. Just start with one egg white for a small batch and increase as needed.
Coloring Royal Icing
Use natural food dye to color the icing for all kinds of decorations.
Recommended Products
As an Amazon Associate and member of other affiliate programs, I earn from qualifying purchases.


Teresa
Friday 11th of October 2024
This is a great idea! Thank you for sharing.
Butter For All
Saturday 12th of October 2024
Hi Teresa,
I'm so happy you think so! It's a lovely tradition that my daughter is really looking forward to again this year! Thanks for being here :)